Posts

Showing posts from September, 2023
Image
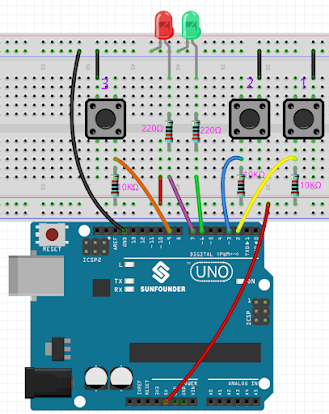
                             Reaction Game ¶ Our body has many reaction times, such as audio RT, visual RT, touch RT, etc. Reaction times have many effects on our daily life, for example, slower than normal reaction times when driving can lead to serious consequences. In this project, we use 3 buttons and 2 LEDs to measure our visual reaction time. The serial monitor of the Arduino displays the message “waiting…” After pressing the Ready button, one of the two LEDs must light up randomly after a random time interval. It is important that the testee pushes the corresponding button as soon as possible. The Arduino records the time difference between when the LED lights up and when the person presses the corresponding button, and prints the measured response time on the Arduino serial monitor. Required Components In this project, we need the following components. 1. Arduino UNO Board 2. Jumper Wire 3. Brea...
Image
   Pumping ¶ The water pump is also a motor, which converts the mechanical energy of the motor or other external energy through a special structure to transport the liquid. Required Components 1. Arduino UNO 2. Jumper Wire                                                   3. L298N Module 4. Centrifugal Pump SCHEMATIC IN1~IN4 are the inputs of the L298N module, and OUT1~OUT4 are the outputs. A simple way to use them is: input high level for INx, OUTx will output high level; input low level for INx, OUTx will output low level. Connecting the two ends of the motor to OUT1 and OUT2, inputting opposite level signals for IN1 and IN2 will make the motor rotate. OUT3 and OUT4 can be used in the same way. Wiring L298N R3 Board Motor 12V 5V GND GND IN3 9 IN4 10 OUT3 one wire of the motor OUT4 one wire of the motor Code Note You can open th...
Image
   How to make a Bluetooth control 4WD car Now let’s see what other components are needed to create this smart car. Arduino Uno board x 1  Motor driver shield x 1  Bluetooth module x 1  Gear motor x 4  Robot wheels x 4 Dot board x 1  Li-ion battery x 2  Battery holder x 1 Jumper wires  THIS IS THE CIRCUIT DIAGRAM FOR THE CAR NEXT IS THE CODE OK, let’s look at the code below. First, you need to download the motor driver shield library. The complete program of this project below; # include <AFMotor.h> AF_DCMotor motor1 ( 1 ) ; AF_DCMotor motor2 ( 2 ) ; AF_DCMotor motor3 ( 3 ) ; AF_DCMotor motor4 ( 4 ) ; int Speed = 230 ; char value ; void setup ( ) { Serial . begin ( 9600 ) ; motor1 . setSpeed ( Speed ) ; motor2 . setSpeed ( Speed ) ; motor3 . setSpeed ( Speed ) ; motor4 . setSpeed ( Speed ) ; } void loop ( ) { if ( Serial . available ( ) > 0 ) { value = Serial . read ( ) ; } if (...